User Management and First Log In
How to create and activate users
User Management
The GDPRiS portal currently has two user types, General Staff and School DP Staff. The General Staff user role is used by most of your school staff.
The School DP Staff role is an Admin user who will create new users, manage suppliers, set up Internal Audits as well as perform DPO tasks within the portal.
Importing Staff Using Template
Note: Bulk Imports must be completed using an .xlsx file
Please find below a link to our template, which is at the bottom of the page, to enable you to create your accounts:
Complete the 3 columns in the template
Save
Close
Choose the Default Role for import under Role Management (Under Administration) on GDPRiS
e.g. if you choose General Staff all staff imported would have General Staff access

Navigate to the User Management page
Import using Find File or Drag and Drop
Click Import
All new staff accounts will be marked as Activated. Therefore the toggle will be green. This is so areas of the platform can be set up before sending registration emails. Users can not access GDPRiS until the Registration email has been sent.
Sending the registration email
When you are ready for your staff to access their GDPRiS accounts you will need to send them a registration email. This email is valid for 7 days.
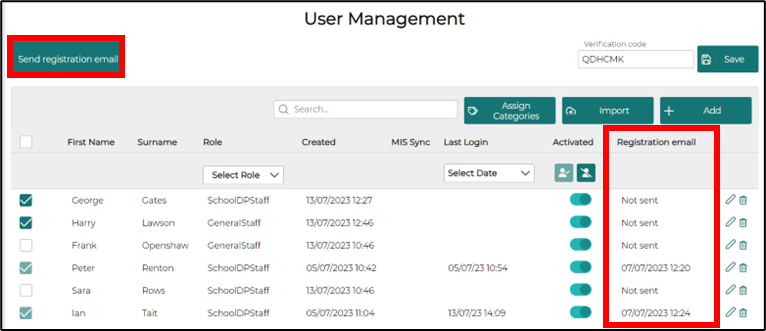
Tick any users that you wish to send the registration email to.
Note: Users that have logged on can not be ticked and will be ‘greyed’ out
Click Send Registration Email
Once this has been sent you will see confirmation in the Registration Sent column next to the users.
First Time Log In
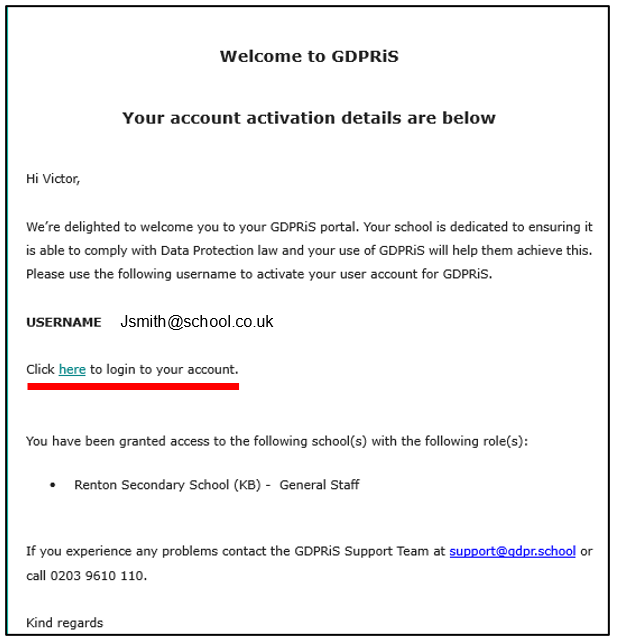
In the registration email, click on the link to take you to the log in page.
Password Requirements
You will be asked to set a password.
Passwords must have:
-
- Between 12-30 characters
- At least one uppercase letter
- At least one lowercase letter
- At least one symbol
- At least one number
Disabling Accounts
If you wish to disable a user account move the toggle to the left. It will appear grey. This will mean that the user no longer has access to the site.

Add a New User Manually
In User Management, click ‘Add'.
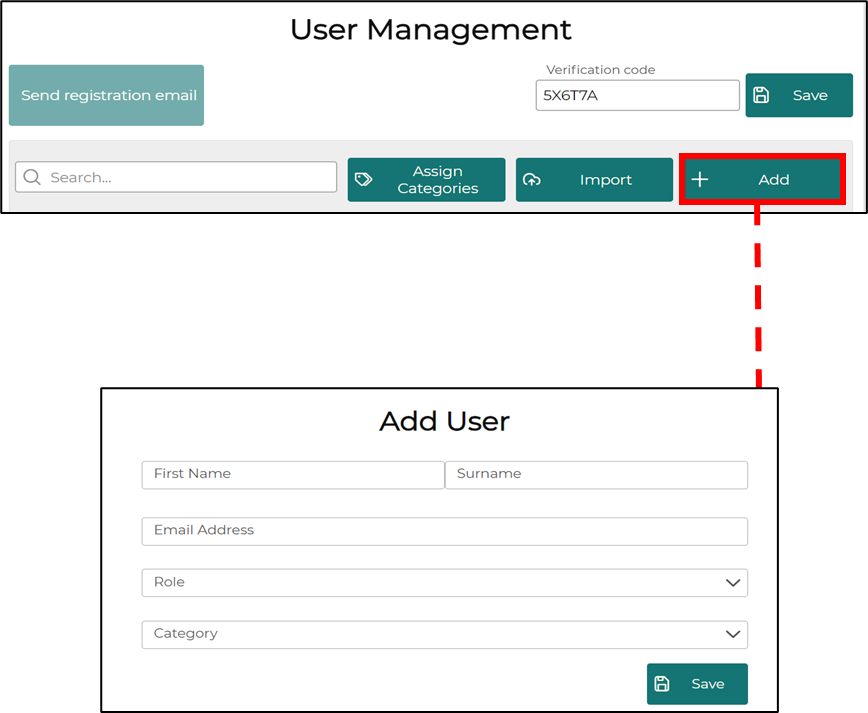
Fill in the relevant details and select which role you want your new user to have.
SAVE.
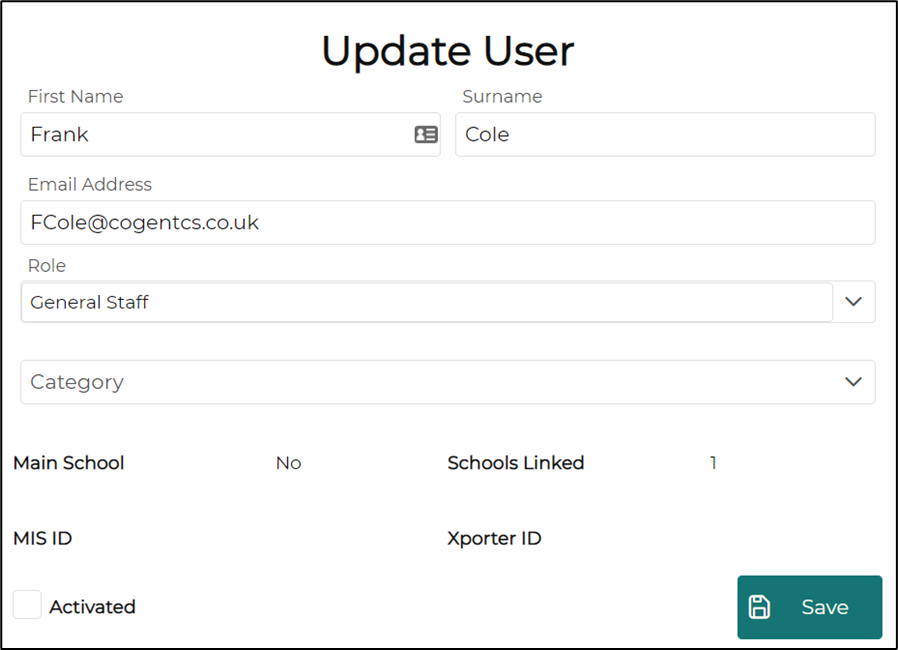
An Update User window will appear.
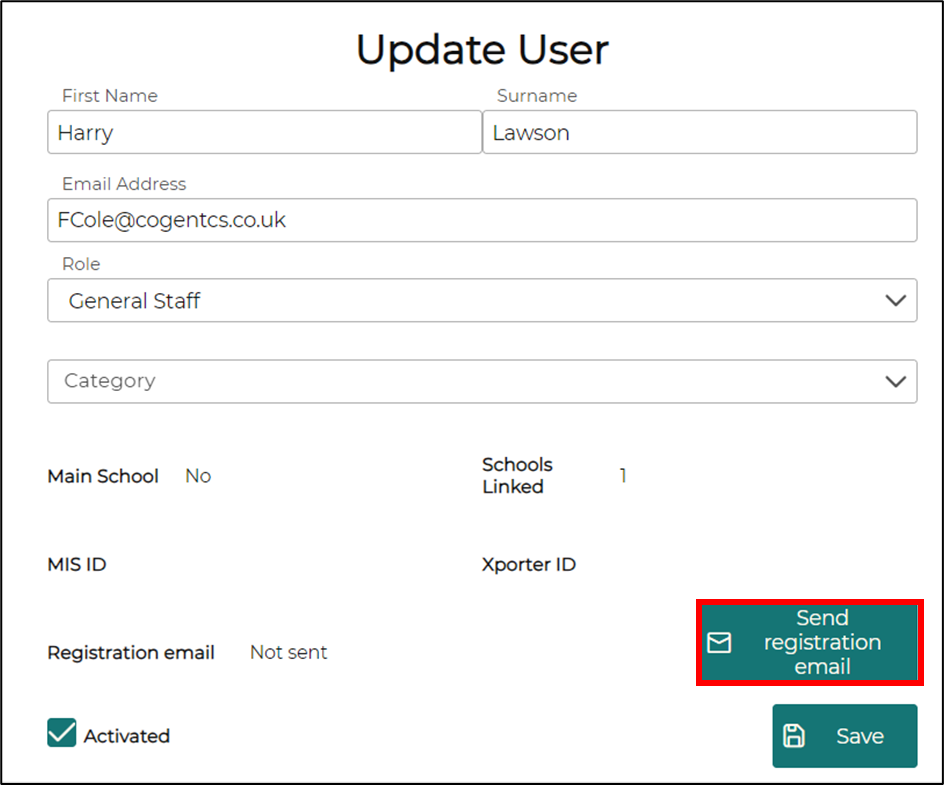
If you are happy at this point for your user to have access to GDPRiS then click the Send Registration Email button. This email is valid for 7 days.
You can do this later from the User Management page
Click SAVE after any amendments.
Categorise Staff
How to categorise users in User Management.
If you wish to enrol your staff onto training course you will need to categorise them.
Navigate to the User Management area via Administration on the Navigation Pane.
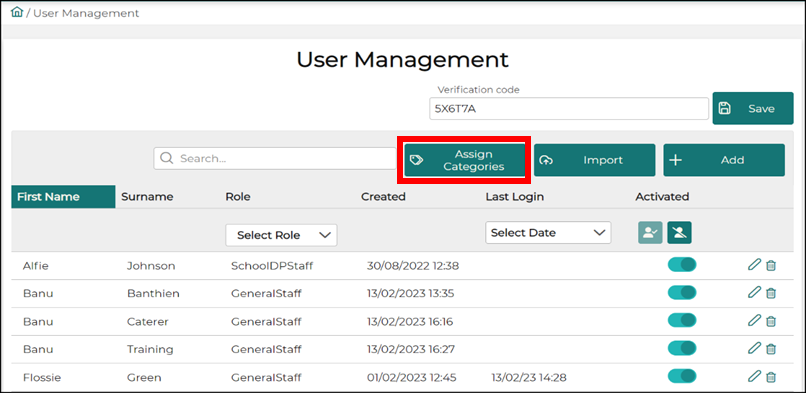
You will see a list of your staff that have accounts on the GDPRiS portal.
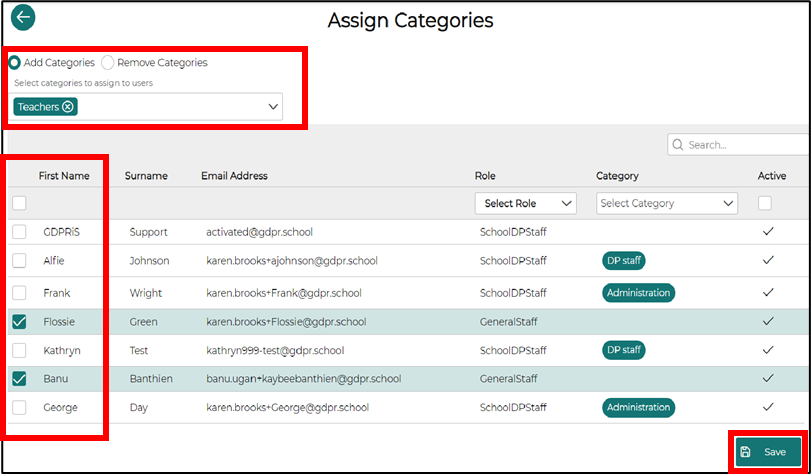
Select Add Categories
Select the users you wish to add a category to.
Select the category/categories you wish to assign to the selected staff.
Please check the confirmation message and click SAVE again
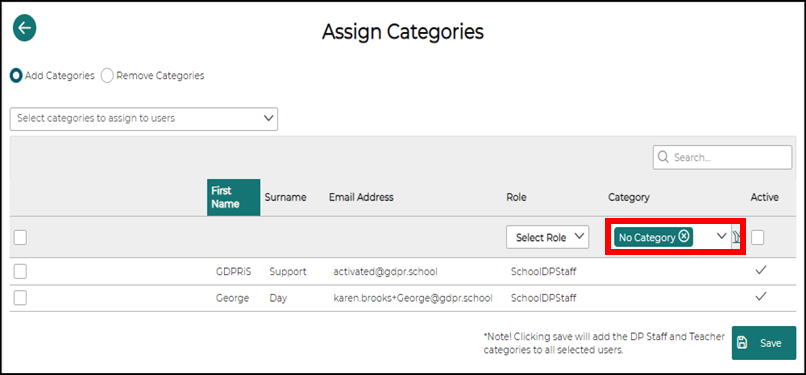
Filter Categories
You can filter by categories to check your selections.
If you choose No Category it will reduce your list and you will see any staff that you may have missed.
Remove Categories
* This process does not unenroll staff from courses
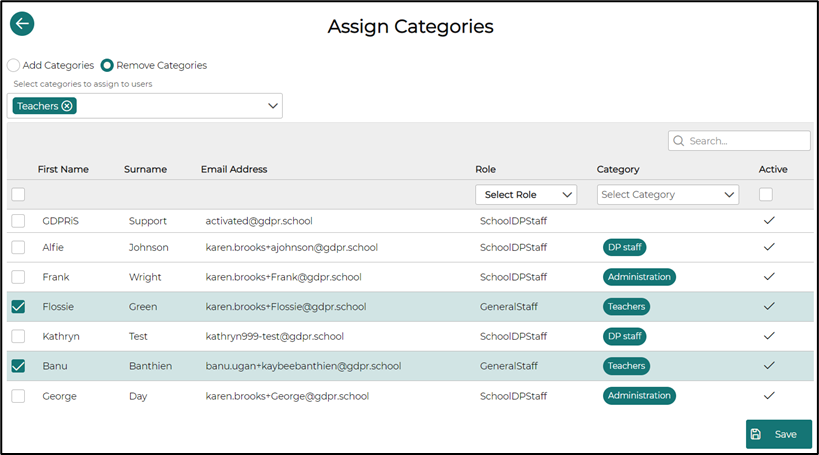
Select Remove Categories
Select the users you wish to remove the category/categories from
Select the category/categories you wish to remove from the selected staff.
Please check the confirmation message and click SAVE again
Forgotten Password
If a User has forgotten a password they can use the following link
Link to Reset Password
You may need to check your junk mail as well as your inbox.
Link to Login Page
Add a New User Manually
In User Management, click ‘Add.
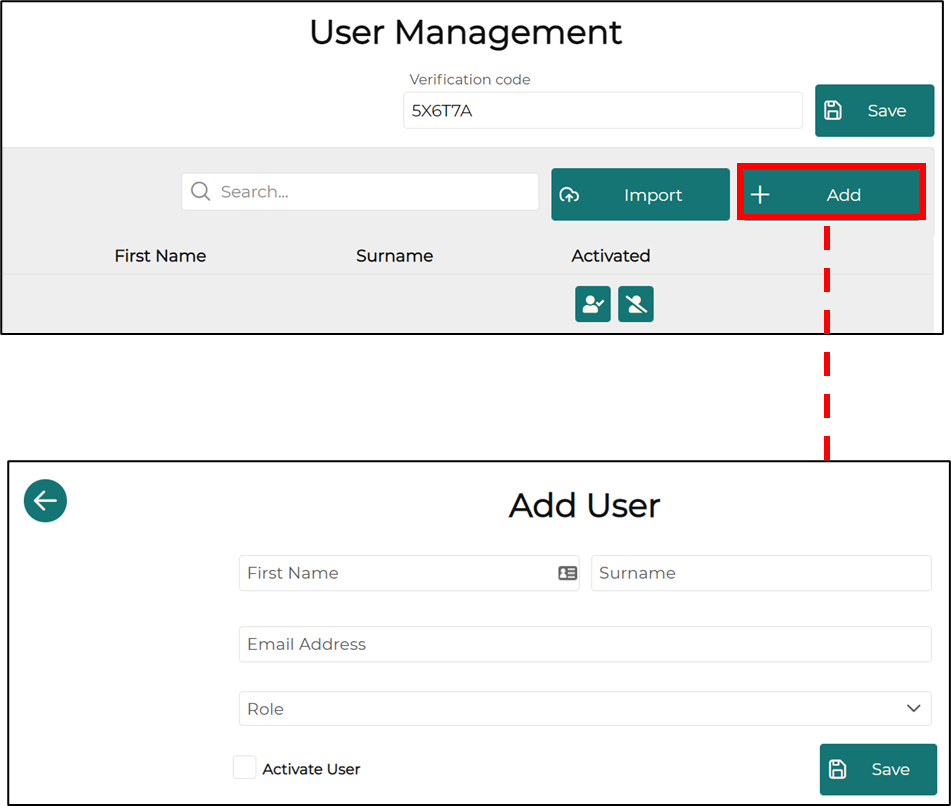
Fill in the relevant details and select which role you want your new user to have.
If you want the user to receive login details immediately tick Activate User.
- NOTE If you want the user to receive login details later leave the Activate User unticked and use the toggle on the User Management page when you are ready.
SAVE.
An Update User window will appear where you can add a category or make any changes necessary.
Click SAVE after any amendments.
Updating and Removing Staff
You can Update User by using this icon.

You can Delete staff by using this icon.

Permissions
Under the Administration section you will find a section called Role Management where you will be able to add different role types and permissions for what those roles can access or do within the GDPRiS portal.
Currently there are two default roles ‘DP Staff’ and ‘General Staff’. You can add more roles to the Role Management section to accommodate the different types of users your organisation has.
Xporter on Demand (XoD)
The GDPRiS portal can be linked up to your schools MIS which uses Groupcall’s Xporter on Demand (XoD) process. This will look to import your staff directly from your MIS. This saves you time on duplicating the same information which is in your MIS into the GDPRiS portal.
There is an annual charge of £65.00 per school for this service.
If you would like to link your MIS with your GDPRiS portal, please send an email to support@gdpr.school and we will begin the process.
How does it work?
GDPR in Schools will add a domain to your school which will be taken from an example user from your User Management portal. We will then run through a process via Groupcall’s XoD portal which will send you an email requesting you to authorise the link between your schools MIS and the GDPRiS portal. XoD in this case acts as the middle man which we use to pass the information from your school to our portal.
Once we have processed your schools request, you will receive an email which will take you through the process via Groupcall’s XoD portal. Information on this can be found via this URL: https://www.youtube.com/watch?v=lJMoBMg-xYM&feature=youtu.be
Once you have completed the process of authorising the link between your schools MIS and GDPRiS, you can log in to your GDPRiS portal, go to the User Management section and use the MIS Sync Now button which now appears.

Once you have clicked the MIS Sync Now button, your portal should then go through the process of importing your users from your MIS. You will need to click OK for your page to refresh to see all your imported users.

At the bottom of your User Management section is a table which shows information on the last performed Synchronise.

From this table, you will be able to see when the sync occurred, which email domain was used, how many users were successfully imported and a message.
Note: Users with the provided email domain will be imported. Any users in your MIS which do not match the provided domain will not be imported.
By default, all users will be imported as General Staff users. If you wish for any of your staff to have higher permissions than the rest of your staff, please edit those users and change their role to School DP Staff.
![GDPRiS-new-black (2).png]](https://kb.gdpris.co.uk/hs-fs/hubfs/Images/GDPRiS%20Logo%20Images/GDPRiS-new-black%20(2).png?width=113&height=85&name=GDPRiS-new-black%20(2).png)
