Information Requests
Logging and managing information requests
Information Request Information
Information below has been taken directly from the ICO website. For further information on subject requests, please visit the ICO website.
The right of access, commonly referred to as subject access, gives individuals the right to obtain a copy of their personal data as well as other supplementary information. It helps individuals to understand how and why you are using their data, and check you are doing it lawfully.
What is an individual entitled to?
Individuals have the right to obtain the following from you:
- confirmation that you are processing their personal data
- a copy of their personal data
- other supplementary information – this largely corresponds to the information that you should provide in a privacy notice
Personal data of the individual
An individual is only entitled to their own personal data, and not to information relating to other people (unless the information is also about them or they are acting on behalf of someone). Therefore, it is important that you establish whether the information requested falls within the definition of personal data.
Other information
In addition to a copy of their personal data, you also have to provide individuals with the following information:
- the purposes of your processing
- the categories of personal data concerned
- the recipients or categories of recipient you disclose the personal data to
- your retention period for storing the personal data or, where this is not possible, your criteria for determining how long you will store it
- the existence of their right to request rectification, erasure, or restriction or to object to such processing
- the right to lodge a complaint with the ICO or another supervisory authority
- information about the source of the data, where it was not obtained directly from the individual
- the existence of automated decision-making (including profiling); and
- the safeguards you provide if you transfer personal data to a third country or international organisation
You may be providing much of this information already in your privacy notice.
How long do we have to comply?
You must comply with a request without undue delay and at the latest within one month of receipt of the request or (if later) within one month of receipt of:
- any requested information to clarify the request (see Can we clarify the request?)
- any information requested to confirm the requester’s identity (see Can we ask for ID?)
- a fee (only in certain circumstances – see Can we charge a fee?)
You should calculate the time limit from the day you receive the request (whether it is a working day or not) until the corresponding calendar date in the next month.
If this is not possible because the following month is shorter (and there is no corresponding calendar date), the date for response is the last day of the following month.
If the corresponding date falls on a weekend or a public holiday, you have until the next working day to respond.
This means that the exact number of days you have to comply with a request varies, depending on the month in which the request was made.
For practical purposes, if a consistent number of days is required (e.g. for operational or system purposes), it may be helpful to adopt a 28-day period to ensure compliance is always within a calendar month.
Can we extend the time for a response?
You can extend the time to respond by a further two months if the request is complex or you have received a number of requests from the individual. You must let the individual know within one month of receiving their request and explain why the extension is necessary.
Setting Up Response Teams
When Information Requests are raised, certain members of your organisation should be made aware so that the correct people can start to investigate and manage them. This can be done via the “Settings” which can be accessed via the navigation menu down the left-hand side under “Incidents and Information Requests”.
Response Teams
In the Settings you can select your DP Lead for Subject Requests as well as their team members.

Information Request Process
Navigate to the Information Request area via the Navigation Pane.
Add a New Information Request
Click on Add Information Request button at the top right of the page.
You will then be taken through 5 screens which need to be completed.
Fill in the information required on each screen for the Subject Request which has been received.
Screen 1- Basic Information

- Type in the name of the person who received the request in the Received By
- Select the date the request was sent to your organisation via the Request Date selection box.
- Select the date the request arrived at your organisation via the Received Date selection box. (Not when the individual handling requests receives it, but the school itself.)
- Type in how the request was made i.e. email, letter etc. in the Request Method
- Select what sort of request the SAR is via the Request Type drop down box. Please note Data Subject will not appear if FOI is chosen.
- Select an owner for the request via the Owner drop down box. Only DP staff can add a Subject Request so only the DP staff on the portal will show in the drop-down list.
Screen 2 - Description
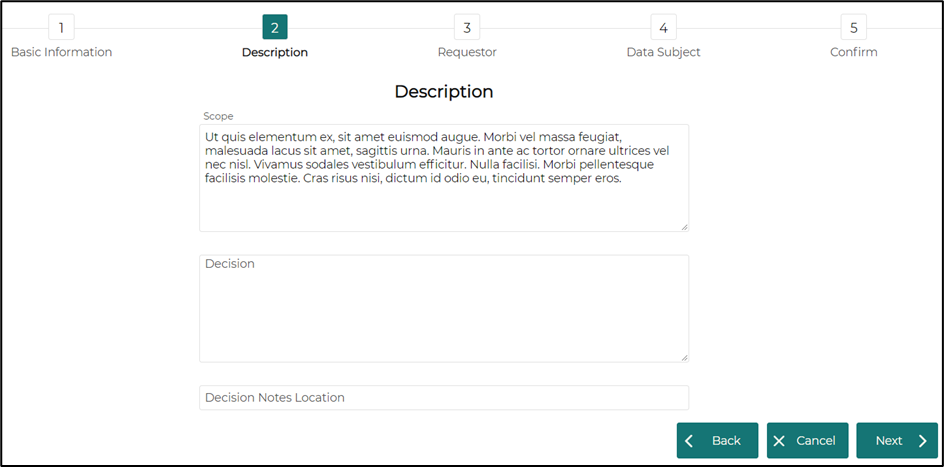
- Manually type in or copy and paste the description of the request from the SAR into the Scope
- Add any other information that you can at this time.
- Don’t fill out the decision immediately, please make sure all reasonable checks have been undertaken.
- Feel free to use the decision notes to record where the documents may be kept within the school
Screen 3 - Requestor
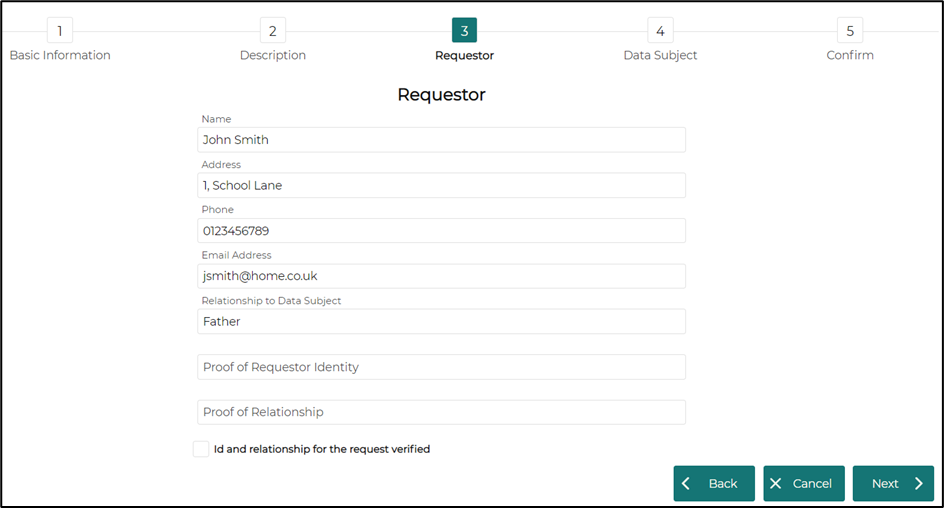
- Fill in the Requestors details that you have currently.
- Place a tick in the Id and relationship for the request verified box if you have the relevant evidence. This can be added later.
Screen 4 – Data Subject
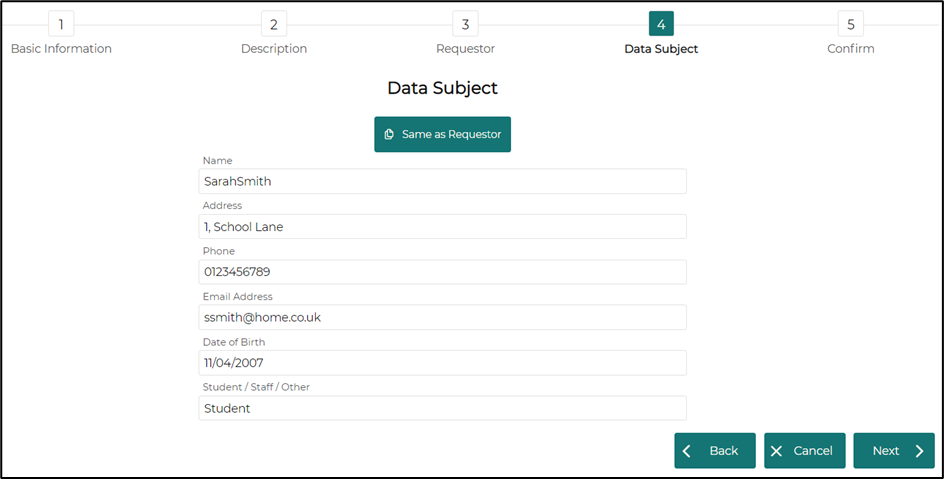
- Fill in the Data Subject details.
- Using Same as Requestor may save you some time
Screen 5 - Confirmation
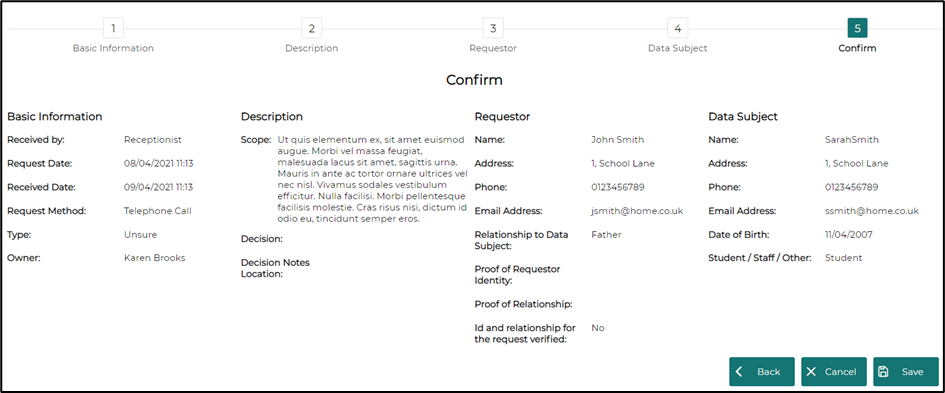
- Check all the details are correct before clicking
- You can go Back or Cancel if necessary.
Adding Hyperlinks to Titles and Comments
It is possible to link to a webpage/shared URL on the title or with in the comments box when updating a breach. You have 2 options when doing this:
- Type the URL directly i.e. google.co.uk – once you click Update the full Web/URL link will be apparent in the recorded comment

- Type the text you wish to see within [ ] and the URL within ( )
Example [GOOGLE](httpss://www.google.co.uk) once you click Update the text you wish to see will be apparent in the recorded comment.

Updating/Editing an Information Request
If you wish to Update/Edit an existing request, click on the edit icon on the far-right hand side.
You have the option of choosing which columns you see by using the Select Columns button.


This will open the relevant Information Request so that you can edit it accordingly.

Use the pencil icon to edit specific fields.
Add a new comment and then click Add to add your new comment to the subject request.
Remember to click Save once you have finished making your changes.
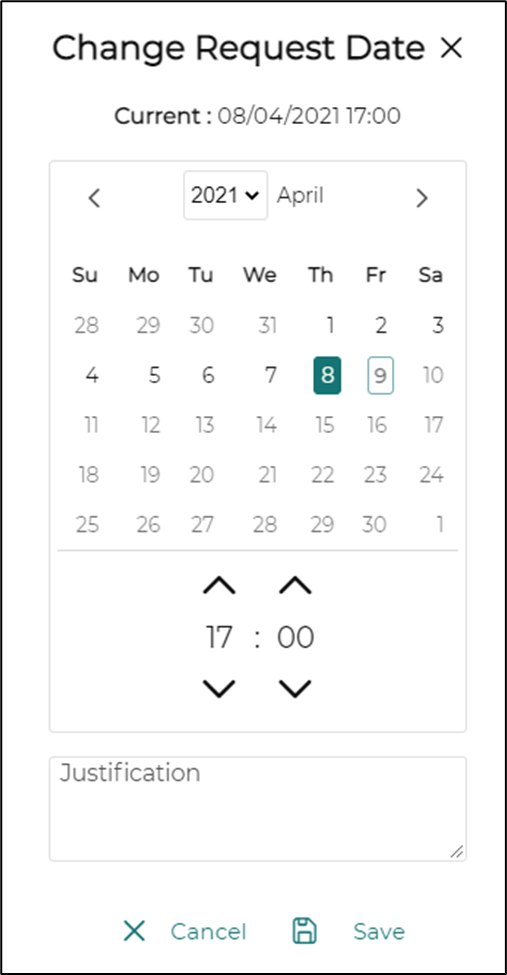
Edit the Request Date field
To edit the Request Date field, click on the edit icon to the right-hand side of the field. (This will open a popup window).
Select the new date that the request was made via the Calendar.
Provide a Justification note for why this change is required via the Justification box.
SAVE
Edit the Received Date field
To edit the Received Date field, click on the to the right-hand side of the field. (This will open a popup window).
Select the New date that the request was made via the Calendar.
Provide a Justification note for why this change is required via the Justification box.
SAVE
Note: A change to the date received value will affect the required response date.

Edit the Response Date field
To edit the Response Date field, click on the to the right-hand side of the field. (This will open a popup window).
Select the New date that the request was made via the Calendar.
Provide a Justification note for why this change is required via the Justification box.
SAVE.
Note: The response date can only be extended up to 2 months from the original response date.

NOTE : The note at the bottom of the window will change for different types of request.
Access, Erasure, Restriction, Rectification, Data Portability and Objection, the note will say:
“You may extend the time limit by a further two months if the request is complex or if you receive a number of requests from the individual.”
Freedom of Information (FOI), Unsure, Pupil Record & Data Sharing the note will say:
FOI “Schools have 20 school days from the date received to complete this type of request, if a time frame of 60 working days is shorter, the school should use this time frame”
Pupil Record “Schools have 15 working days from the date received to complete this type of request”
Data Sharing – no note
For Information Requests which are of the type "Review", the response date selection box has been removed as schools are not tied to a time frame to complete these in.
Edit the Status field
To edit the Status field, click on the to the right-hand side of the field. (This will open a popup window).
Select the new status via the New drop-down menu.
Provide a Justification note for why this change is required via the Justification box.
SAVE.

Edit the Type field
To edit the Type field, click on the to the right-hand side of the field. (This will open a popup window)
Select the new request type via the New drop-down menu.
Note: At the bottom there is a note section explaining what the different response time limits are for the type which you have selected.
Provide a Justification note for why this change is required via the Justification box.
SAVE.

Edit the Decision and Decision Notes Location Fields
To edit the Decision and Decision Notes Location fields, click on the to the right-hand side of the field.
When a decision has been made by the school on how or if it is going to respond to the Subject Request, this can be captured via the Decision field.
You should be storing a documented decision for the subject request separately which can be referred to via the Decision Notes Location field. Manually type in the document location for reference.
SAVE all changes.

Add an Information Request Review
In the event that an Information Request needs to be reviewed, a DP staff member can log an Information Request Review.
Open an Information request by using the pencil icon on the log page.
Click on the button under the title of the request.

You will see the following 4 pages
Fill in all required areas clicking next on each page until you reach the confirmation screen.
Check all details and then save.

Information Request Statuses
You will notice throughout the lifecycle of your requests that they will change colour. These colours depend on the different types of Status, time since you have responded to the request and how long you have left to complete the request.
The graphs will also show the status colours on the Overview page.
Colour Status
White = New or Completed Request
Yellow = Request in pending state and has 5 days left to complete
Red = Request expired (failed to complete request on time)
User Guides: Information Requests
![GDPRiS-new-black (2).png]](https://kb.gdpris.co.uk/hs-fs/hubfs/Images/GDPRiS%20Logo%20Images/GDPRiS-new-black%20(2).png?width=113&height=85&name=GDPRiS-new-black%20(2).png)


